light bar combo wiring instruction
Once you have mechanically installed your new LED light bar, it is time to give it a steady supply of electrons so it has a steady supply of night vanquishing power. Learning how to wire and LED light bar correctly ensures reliability and avoids unsafe operating conditions or damage to your vehicle.
Safety First, of Course
Tip #1: Please do not skip over this section unless you have a great deal of experience with electrical wiring and components.
Neutralize the Ultimate Power Source
Your car or truck battery may appear dull and non-threatening, but it is a potentially life-threatening storehouse of electrons looking for any way out at the speed of light.
Before you start, disconnect the vehicle battery. Do not take shortcuts. Disconnect it.
Tip #2: Always remove the ground terminal clamp first followed by removing the positive side clamp. This greatly reduces the risk of shorting the battery, which is both exciting and very dangerous. Removing the positive terminal first risks you or a tool coming into contact with any metal connected to the negative terminal, which is most of the car.
Sizing up Your Wire
Many people make the analogy that electrical current through a wire is like water through a hose. Unlike water hoses, however, pushing excessive electrical current through a wire that is too small will melt the insulation or cause a fire.
Fortunately, you already know how much current your LED light bar requires. So, you can easily choose the size of wire to feed it safely. Below is a list of automotive wire sizes and their safe current ratings.
AmpsLength in feet5A10A15A20A25A30A40A50A1516121010886620141210886642514108866443012108664424012866442250108644221
The left column is the length of a wire, in feet. The top row is the number of amps applied to the wire. Choose a column that is equal to or greater than the maximum current draw of your light bar. The intersection between the selected row and column indicates the proper size of wire, in AWG or American Wire Gauge, you should use for the circuit.
Tip #3: It never hurts to choose one gauge larger, which means a lower AWG. This provides a greater margin of safety.
Tip #4: When wiring LED light bar relays or switches, fuse all positive side wires such as from the positive battery terminal to the light bar switch. The fuse rating should not correspond to the wire size but instead to the maximum current expected on that wire. In this case, that would be the light bar’s maximum current.
Wire Grades
There are three grades of automotive wire: GPT, GXL and TXL. Your local auto parts will have GPT wire but probably not GXL or TXL grades. These grades have a higher temperature range and better resistance to solvents and other chemicals. If you can afford them, use them.
Connectors
Your LED light bar probably has an IP67 or higher rating. Why compromise that with leaky connectors? Look for quality watertight wire connectors in a local marine store. When wiring LED light bar connectors, use crimpers that are specified for them.
Good watertight connectors do not need a coating of silicone or electrical tape. If you are so compelled, however, use marine grade silicone and professional quality electrical tape.
Tip #5: Wrap electrical tape snugly over connectors without stretching or it will slowly unravel later.
To Relay or Not to Relay?
Automotive relays are inexpensive and most handle 40A of current, which is more than enough for even large LED light bars. The relays are switched via a cab switch whose circuit carries less than 1A. Therefore, for a large light bar you can use a smaller cab switch and smaller wire on the switch circuit.
Tip #6: If your LED light bar came with a wiring harness and it includes a relay, use it, end of story.
If you have no wiring harness, use a relay if your light bar draws over 5 amps. When directly switching a light bar, use a switch with a minimum 10A rating.
The diagram below shows the bottom side of a standard 12VDC automotive relay. Be sure the relay power capacity exceeds the amperage of your light bar’s maximum current draw.
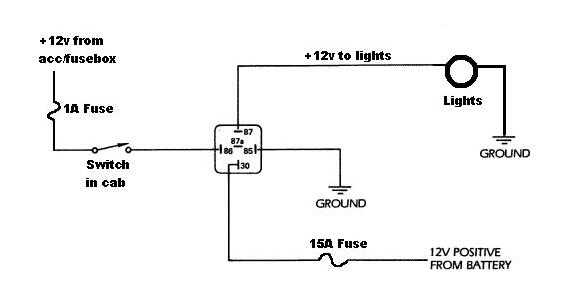
The terminals have a standard numbering scheme. A fused wire runs between the positive battery terminal to relay terminal 30. Terminal 85 connects to a vehicle ground point. The load side of the cab switch goes to terminal 86. The positive wire from the light bar attaches to terminal 87 and the light bar’s negative wire attaches to a vehicle ground.
Routing the Wiring
Try to keep wire lengths as short as possible. Route wires along firewalls or the vehicle chassis. Route wire away from high heat areas. Avoid splicing wire when possible. If you have a rooftop LED light bar, run the power wires through a windshield frame channel.
Tip #7: Add a dual waterproof connector near the light bar for easy disconnection when the light needs to be removed.
Tip #8: Use separate wire colors for different circuits so they are easily identifiable. For instance, red for the wire from the battery to the relay, black for ground wires, yellow for a wire running from a relay to its switch, and so on.
Conclusion
A lot more can be said in regard to how to wire an LED light bar. However, the information in this guide should be enough for the handy person to complete the task. If you have doubts about your ability to deal with wiring, do not hesitate to employ an electrical specialist.
Once your LED light bar has been properly wired, you can drive with confidence knowing that your bright, night-splitting LEDs are getting all the power they can consume, reliably and safely.
- remphos led bar kit lbi wiring diagram pdf
- How to wire a combo light bar
- http://www.eyourlife.com/light-bar-combo-wiring-instruction